Introduction to Biscoff Cheesecake
Embark on a culinary adventure with our Biscoff Cheesecake Recipe, a dessert that has rapidly become a favorite for many. This recipe artfully combines the unique flavors of Biscoff cookies with the creamy richness of cheesecake, creating a treat that delights both the taste buds and the eyes. Perfect for special occasions or as a luxurious everyday dessert, this Biscoff Cheesecake stands out with its distinctive taste, characterized by rich caramel and cinnamon notes.
- The Popularity of Biscoff Cheesecake:
- Biscoff, a spiced shortcrust biscuit, has gained immense popularity worldwide. Its unique taste, characterized by caramel and cinnamon notes, makes it an ideal ingredient for desserts.
- The fusion of Biscoff with cheesecake has led to a dessert that is both innovative and comforting. The popularity of this cheesecake variant is evident in its frequent appearance in cafes, bakeries, and social media feeds.
- Understanding Biscoff: A Unique Ingredient:
- Originating from Belgium, Biscoff cookies are known for their distinct flavor profile. To understand more about these cookies, visit Lotus Bakeries, where you can explore the origin of Biscoff cookies.
- The key to the unique flavor of Biscoff Cheesecake lies in the use of both Biscoff cookies and Biscoff cookie butter. These ingredients provide a rich, spiced, and caramelized flavor that sets this cheesecake apart from traditional recipes.
- For those interested in exploring more cream cheese dessert ideas, including variations of cheesecake, check out Cream Cheese Recipes.
In the next sections, we will delve into the ingredients and equipment needed to create this delightful dessert, followed by step-by-step instructions for each stage of the preparation process.
Essential Ingredients and Equipment
Creating your Biscoff Cheesecake Recipe comes to life with a combination of specific ingredients and kitchen tools. Here, we’ll list what you’ll need to bring this delicious dessert to life.
- List of Ingredients for Biscoff Cheesecake:
- Biscoff Cookies: The foundation of the crust and a key flavor component.
- Unsalted Butter: For binding the crust.
- Cream Cheese: The base of the cheesecake filling.
- Brown Sugar and Granulated Sugar: To sweeten the mixture.
- Sour Cream: For added creaminess and texture.
- Biscoff Cookie Butter: To infuse the cheesecake with rich Biscoff flavor.
- Vanilla Extract: For an additional layer of flavor.
- Salt: To balance the sweetness.
- Eggs: To bind the cheesecake filling and add richness.
- Necessary Kitchen Equipment:
- Food Processor or Rolling Pin: For crushing Biscoff cookies into crumbs.
- Electric Mixer: Essential for mixing the cheesecake batter smoothly.
- Springform Pan: Ideal for cheesecakes, as it allows for easy removal.
- Large Roasting Pan: For the water bath during baking, which helps prevent cracks.
Each ingredient plays a crucial role in creating the perfect Biscoff Cheesecake. The Biscoff cookies and cookie butter provide the distinctive flavor, while the cream cheese and sour cream ensure a creamy, smooth texture. The sugars add sweetness, and the eggs bind the mixture together, giving the cheesecake its classic dense yet soft consistency.
In the next section, we’ll guide you through the process of preparing the Biscoff cookie crust, a critical step in achieving the perfect base for your cheesecake.
Crafting the Perfect Biscoff Cookie Crust
The crust is a crucial component of any cheesecake, and for a Biscoff Cheesecake, it’s where the unique flavor begins. Here’s how to prepare a flawless Biscoff cookie crust.
- Step-by-Step Crust Preparation:
- Crush the Biscoff Cookies: Use a food processor to turn the cookies into fine crumbs. If you don’t have a food processor, place the cookies in a ziplock bag and use a rolling pin to crush them.
- Mix with Melted Butter: Combine the cookie crumbs with melted unsalted butter. This mixture will form the base of your crust.
- Press onto the Pan: Transfer the mixture to your springform pan. Press it down firmly to create an even layer. This will ensure your crust is stable and holds together well.
- Bake the Crust: Preheat your oven and bake the crust for about 10 minutes at 325°F (163°C). It should be slightly golden when done.
- Tips for a Flawless Crust:
- Even Thickness: Ensure the crust is evenly spread across the pan and up the sides to avoid uneven baking.
- Chill Before Filling: Let the crust cool completely before adding the cheesecake batter. This helps to set the crust and prevents it from becoming soggy.
- No Cracks: If you notice any cracks or holes, patch them up with some extra crust mixture to prevent the filling from leaking.
The Biscoff cookie crust sets the stage for the rest of the cheesecake. Its spiced, caramelized flavor complements the creamy filling, making each bite a delightful experience.
In the next part, we’ll dive into the process of making the Biscoff Cheesecake batter, where the creamy and rich flavors come to life.
Creating the Biscoff Cheesecake Batter
The heart of the Biscoff Cheesecake is its luscious and flavorful batter. This section guides you through combining ingredients for your Biscoff Cheesecake Recipe to achieve a smooth and creamy filling.
- Combining Ingredients for the Batter:
- Beat the Cream Cheese: Start by beating the cream cheese until it’s smooth and creamy. This is crucial for a lump-free cheesecake.
- Add Sugars: Incorporate both brown sugar and granulated sugar into the cream cheese. Mix until well combined.
- Mix in Biscoff Cookie Butter and Sour Cream: Add the Biscoff cookie butter and sour cream to the mixture. These ingredients add depth and richness to the flavor.
- Incorporate Eggs and Vanilla: Finally, mix in the eggs, one at a time, along with the vanilla extract and a pinch of salt. Be careful not to overmix at this stage to avoid incorporating too much air, which can cause cracks.
- Avoiding Common Cheesecake Mistakes:
- Room Temperature Ingredients: Ensure all ingredients are at room temperature to achieve a smooth batter.
- Gentle Mixing: Overbeating can introduce too much air into the batter, leading to cracks during baking.
- Scrape Down the Bowl: Regularly scrape the sides and bottom of the bowl to ensure all ingredients are evenly incorporated.
Creating the perfect Biscoff Cheesecake batter is all about balance and precision. The right mix of ingredients and technique will result in a cheesecake that’s creamy, rich, and bursting with the unique flavor of Biscoff.
In the next section, we’ll cover the baking and cooling process, which is key to achieving the perfect texture and preventing any cracks in your cheesecake.
Baking and Cooling Process
Baking and properly cooling your Biscoff Cheesecake Recipe are critical steps in achieving the perfect texture and preventing cracks. This section will guide you through these crucial stages for your Biscoff Cheesecake.
- Detailed Baking Instructions:
- Preheat the Oven: Set your oven to 325°F (163°C). Consistent temperature is key for even baking.
- Pour the Batter: Gently pour the cheesecake batter over the cooled Biscoff cookie crust in the springform pan.
- Water Bath Setup: Wrap the bottom of the springform pan with aluminum foil. Place the pan in a larger roasting pan and fill the roasting pan with hot water. This water bath helps prevent cracks by providing a moist and even heat.
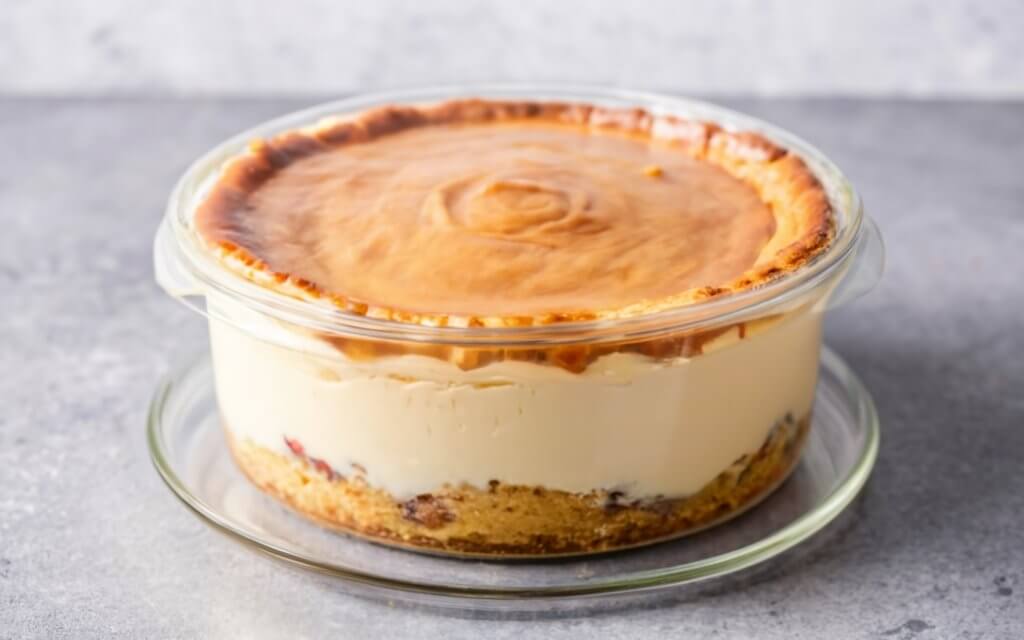
- Bake: Place the cheesecake in the oven and bake for 60 to 70 minutes. The edges should be set, but the center should still have a slight jiggle.
- Cooling and Preventing Cracks:
- Gradual Cooling: Once baked, turn off the oven and leave the cheesecake inside with the door slightly ajar for about an hour. This gradual cooling helps prevent sudden temperature changes that can cause cracks.
- Refrigerate: After cooling in the oven, remove the cheesecake and let it cool to room temperature. Then, refrigerate for at least 6 hours, preferably overnight, to fully set.
The baking and cooling stages are as important as the preparation of the batter. They ensure that your Biscoff Cheesecake has the perfect creamy texture and a crack-free surface.
In the next part, we’ll explore creative ways to decorate your cheesecake, adding the final touches to this delightful dessert.
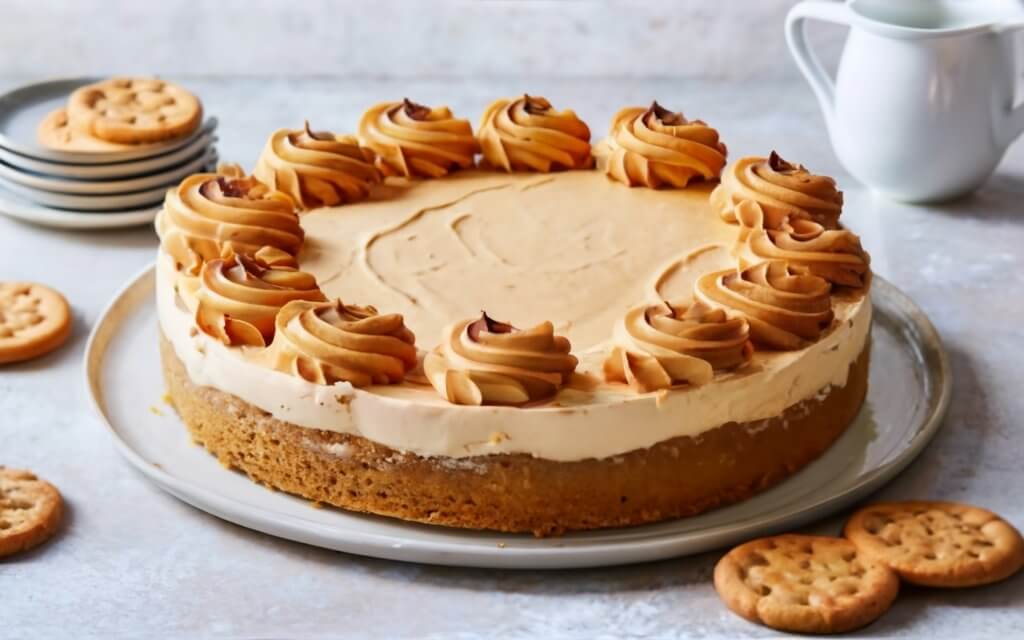
Decorating Your Biscoff Cheesecake
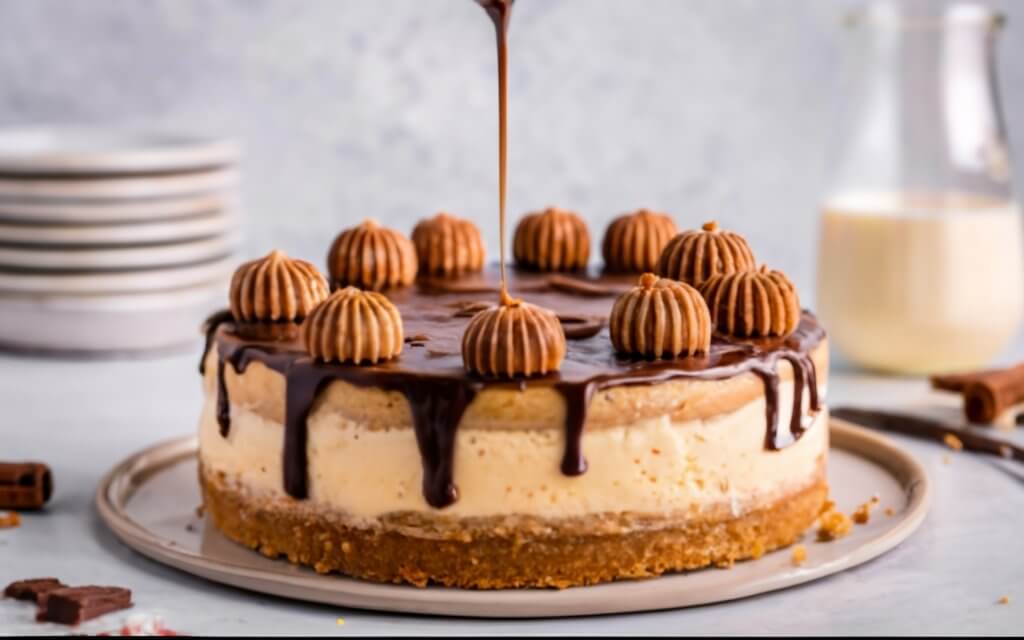
Once your Biscoff Cheesecake Recipe is baked and cooled, it’s time to add those final decorative touches that make it not just delicious, but also visually appealing. Here are some creative ideas for decorating your Biscoff Cheesecake.
- Creative Decoration Ideas:
- Melted Biscoff Spread: Gently melt some Biscoff cookie butter and drizzle it over the top of the cheesecake. Use an offset spatula to create a smooth, even layer or artistic swirls.
- Biscoff Cookie Crumbs: Sprinkle crushed Biscoff cookies around the edges or over the entire surface for added texture and flavor.
- Whipped Cream: Pipe whipped cream around the edges for a classic look. This adds a light, airy texture that contrasts beautifully with the dense cheesecake.
- Whole Biscoff Cookies: Place whole Biscoff cookies around the edge or on top of the cheesecake for a decorative and tasty garnish.
- Presenting Your Cheesecake:
- Chilled Serving: Always serve your cheesecake chilled. It not only tastes better but also holds its shape when slicing.
- Clean Slices: Dip your knife in hot water and wipe it dry before each cut. This ensures clean, sharp slices that showcase the layers of your cheesecake.
- Plating: Serve each slice on individual plates with a dollop of whipped cream or a drizzle of Biscoff spread for an extra touch of elegance.
Decorating your Biscoff Cheesecake is an opportunity to get creative and add your personal touch. Whether you keep it simple or go for a more elaborate decoration, the key is to complement the rich flavors and textures of the cheesecake.
In the next section, we’ll discuss how to store your cheesecake, ensuring it remains fresh and delicious for every serving.
Storing Your Biscoff Cheesecake
Proper storage is key to maintaining the freshness and flavor of your Biscoff Cheesecake Recipe. Here are some tips to ensure your cheesecake stays delicious for every serving.
- Refrigeration and Freezing Tips:
- In the Fridge: Store the cheesecake in the refrigerator, covered with plastic wrap or in an airtight container. It can be kept for up to 4 or 5 days.
- Freezing for Longer Storage: For longer storage, the cheesecake can be frozen. First, freeze the cheesecake on a baking sheet until solid, then wrap it tightly in plastic wrap and place it in an airtight container. It can be stored in the freezer for up to 2 months.
- Maintaining Freshness and Flavor:
- Thawing: When ready to serve, thaw the cheesecake in the refrigerator overnight. Avoid thawing at room temperature as it can affect the texture.
- Avoiding Freezer Burn: Ensure the cheesecake is wrapped tightly in plastic wrap before placing it in an airtight container. This helps prevent freezer burn and keeps the cheesecake moist.
Storing your Biscoff Cheesecake correctly will ensure that each slice is as good as the first, whether you’re enjoying it a day later or several weeks later.
In the final section, we’ll answer some frequently asked questions about making and enjoying Biscoff Cheesecake.
Frequently Asked Questions
In this final section, we address some common queries about making and enjoying Biscoff Cheesecake. These FAQs provide additional insights and tips to help you perfect your cheesecake-making skills.
- Can I make Biscoff Cheesecake without a springform pan?
- While a springform pan is ideal for cheesecakes due to its removable sides, you can use a regular cake pan. Line it with parchment paper for easier removal of the cheesecake.
- How do I know when the cheesecake is perfectly baked?
- The cheesecake is done when the edges are set, but the center still has a slight jiggle. Avoid overbaking, as the cheesecake will continue to set as it cools.
- Can I use low-fat cream cheese for the cheesecake?
- It’s best to use full-fat cream cheese for the richest texture and flavor. Low-fat cream cheese can make the cheesecake less creamy and more prone to cracks.
- Why did my cheesecake crack, and how can I prevent it?
- Cracks can occur due to overmixing, sudden temperature changes, or overbaking. To prevent cracks, mix the batter gently, use a water bath, and allow the cheesecake to cool gradually in the oven.
- Is it necessary to use a water bath?
- While not mandatory, a water bath helps provide gentle, even heat, which is key to preventing cracks and ensuring a smooth, creamy texture.
- How can I add more Biscoff flavor to the cheesecake?
- Increase the Biscoff flavor by adding more Biscoff cookie butter to the batter or using additional crushed Biscoff cookies for the crust and decoration.
- Can I make this cheesecake ahead of time?
- Yes, you can make Biscoff Cheesecake up to 2 days in advance. Store it in the refrigerator until ready to serve.
Conclusion
Creating the perfect Biscoff Cheesecake is indeed an enjoyable journey. Firstly, it combines the unique flavors of Biscoff with the classic richness of cheesecake. Secondly, by meticulously following the steps outlined in this guide, from selecting the right ingredients to mastering the baking process, you can create a dessert that not only tastes delightful but also looks stunning. Furthermore, remember that the key to a great cheesecake lies in the details – specifically, the quality of ingredients, the precision in preparation, and the patience in baking and cooling.